

Introduction: Why GRP Tank Cleaning Matters in Saudi Arabia
In Saudi Arabia’s arid climate, water storage tanks face unique challenges. Extreme summer heat exceeding 50°C, intermittent water supply in some villas, dust infiltration, and mineral-rich groundwater create an ideal environment for biofilm, algae, and sediment accumulation—even in modern fiberglass tanks. Unlike steel tanks that corrode or concrete tanks that crack, GRP (glass-reinforced plastic) tanks offer superior hygiene due to their non-porous, smooth surfaces. However, this advantage is only maintained through regular, systematic cleaning and disinfection.
The National Water Company (NWC) and SASO (Saudi Standards, Metrology and Quality Organization) guidelines recommend that potable water tanks be cleaned at least every six months, with more frequent intervals in high-dust or high-temperature zones. Failure to maintain cleaning schedules leads to taste/odor complaints, bacterial contamination (including Legionella), and potential waterborne disease outbreaks—critical concerns for residential and commercial facilities across the Kingdom
This guide provides a complete, standards-based framework for cleaning GRP water tanks in KSA. You will learn when to clean, how to clean safely (including confined-space entry protocols), disinfection procedures with verified chlorine residual targets, and maintenance practices that prevent costly contamination. All recommendations are grounded in WHO, CDC, and Saudi regulatory guidance, with working links to source documents.
GRP/FRP Tanks: Basics and Cleaning Considerations
What Are GRP Water Tanks?
GRP (glass-reinforced plastic) tanks, also called FRP (fiberglass-reinforced plastic) tanks, are manufactured from multiple layers: an outer gel-coat layer (UV and chemical protection), glass fiber reinforcement, and an inner resin matrix. These modular tanks are bolted together on-site, creating a lightweight, non-corrosive, hygienic water storage system. In Saudi Arabia, GRP tanks are specified for potable water storage under SASO-GSO-1831 and are increasingly preferred over steel (which rusts rapidly in coastal/high-salt areas) and concrete (which cracks under thermal stress).
Key Tank Surfaces and Components
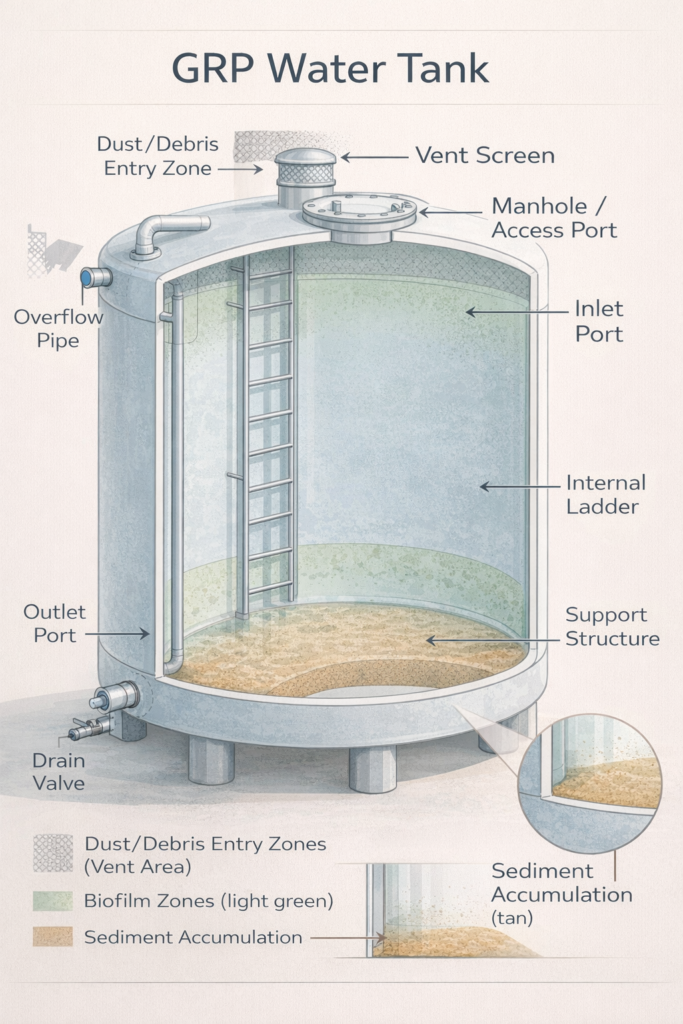
Understanding tank anatomy helps identify where biofilm, sediment, and contamination accumulate:
- Gel coat and inner surface: Smooth, non-porous surfaces that resist bacterial attachment when clean
- Manhole/access port: Primary entry point; must be sealed tightly to prevent dust and pest ingress
- Vent screens: Filter incoming air; easily clogged by dust or biofilm
- Inlet and outlet fittings: May harbor sediment or biofilm in dead zones
- Overflow pipe: Often neglected; can become breeding ground for algae if exposed to light
- Drain valve: Where sediment collects; must be flushed regularly
- Ladder/climbing points: Can accumulate mineral deposits and slime
What Cleaning Can and Cannot Fix
Cleaning removes sediment, biofilm, algae, and bacterial biofilms from internal surfaces, restoring water hygiene. However, cleaning cannot repair structural damage (cracks, leaks), cannot restore gelcoat color if UV-degraded, and cannot improve water quality if the source water is contaminated or mineral-saturated. If you detect leaks, cracks, or persistent discoloration after professional cleaning, the tank may require structural repair or lining. For potable water tanks, compliance with SASO-GSO-1831 and WHO potable water guidelines is non-negotiable.
When to Clean: Signs and Recommended Frequency
Visual and Sensory Signs That Your Tank Needs Cleaning NOW
Do not wait for a scheduled cleaning if you observe any of the following:
- Odor from taps: Musty, sulfur-like, or foul smell indicates bacterial proliferation or anaerobic decomposition
- Discolored water: Brown, yellow, or cloudy water suggests sediment or mineral precipitation
- Visible sediment or debris: Floating particles, sludge on the bottom, or visible in clear glass jars of drawn water
- Slime or biofilm: Slimy, green, or brown coating on interior surfaces visible through manhole or test ports
- Unusual taste: Metallic, salty, or chemical taste may indicate microbial contamination or chemical leaching (rare with NSF 61–certified GRP)
- Low water pressure or flow: Blockage in inlet, outlet, or distribution lines due to sediment
- Visible debris or insects: Dust, leaves, insects, or dead organisms in the water
- Mold or visible growth on external surfaces: Indicates moisture and biological activity; internal contamination likely
Recommended Cleaning Frequency for KSA
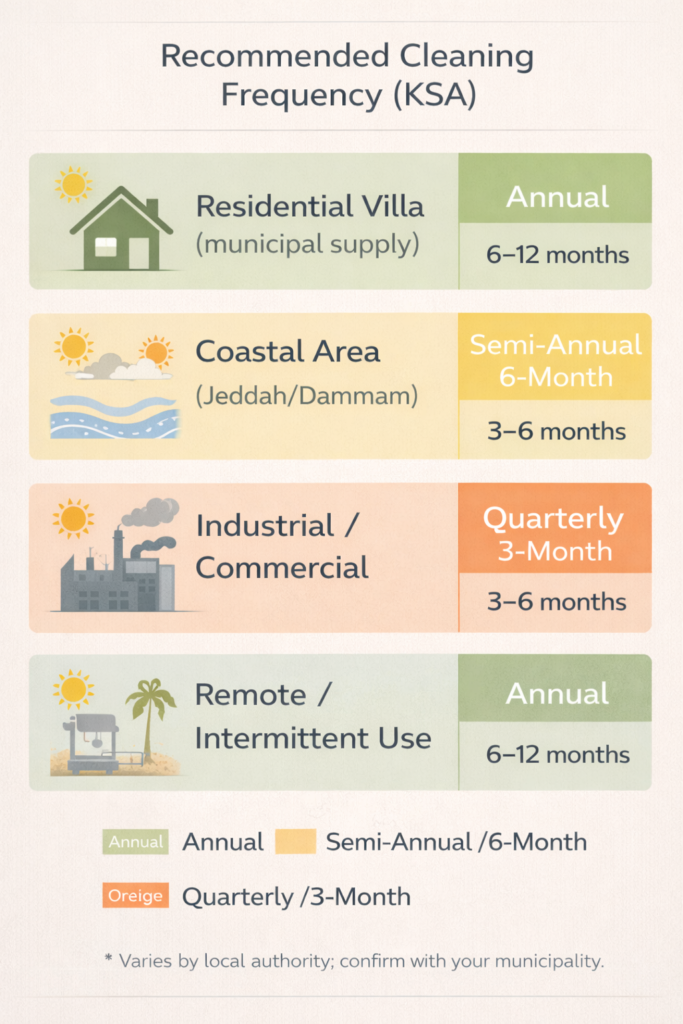
Frequency depends on water source quality, tank size, climate zone, and usage intensity:
| Tank Type / Usage | Recommended Frequency | Notes |
|---|---|---|
| Residential villa (4–10 m³), municipal supply water, Riyadh/Mecca | Every 6–12 months | Treated municipal water has lower contamination risk; adjust to annual if no signs of sediment/discoloration |
| Residential villa, coastal area (Jeddah, Dammam), or rooftop tank | Every 3–6 months | Salt spray, dust, and heat increase biofilm risk; increase to quarterly if tank sits in full sun |
| Commercial/industrial facility (frequent use, high-temperature processes) | Every 3–6 months | High usage + mineral-rich recycled water + heat = faster biofilm accumulation |
| Remote/agricultural site, intermittent/low usage | Every 6–12 months | Stagnation risk is high; consider quarterly inspection even if no cleaning is needed |
| After any system repair, pump replacement, or water service disruption | Immediate | Sediment disturbance and potential contamination from pipe work |
| If source water is from well, bore, or untreated supply | Every 3–4 months | Higher microbial and mineral load; more frequent cleaning essential |
Source: WHO potable water tank guidance, NWC recommendations for Saudi installations, CDC best practices.
Note: Frequency varies by municipality. Jeddah municipality, Riyadh municipality, and Eastern Province water authorities may have specific local requirements.
Safety & Preparation: Confined Space Hazards and HSE Protocols
Critical Confined Space Hazard Overview
Water tanks, especially large underground or rooftop installations, meet the definition of a “confined space” under occupational safety standards (OSHA 1910.146 and equivalent international standards). Confined spaces present serious hazards:
- Oxygen deficiency: Stagnant water and biofilm produce anaerobic bacteria that consume oxygen, reducing levels below the safe minimum of 19.5%.Click here
- Toxic gases: Hydrogen sulfide (H2S), carbon monoxide (CO), and methane may accumulate in poorly ventilated tanks
- Engulfment and drowning risk: Slippery surfaces, sediment, and collapse potential
- Limited exit: Narrow manhole openings create rescue difficulties if a worker becomes incapacitated
- Chemical hazards: Disinfection chemicals (chlorine, HTH) are caustic and can cause respiratory damage or burns
For Small Tanks (≤5 m³) or External Cleaning Only:
Professional tank cleaning may be performed without internal entry if the tank is small enough and sediment/debris can be removed externally or via drain valve. This is the recommended approach for most residential villas in KSA.
For Large Tanks (>10 m³) or Heavy Contamination Requiring Internal Entry:
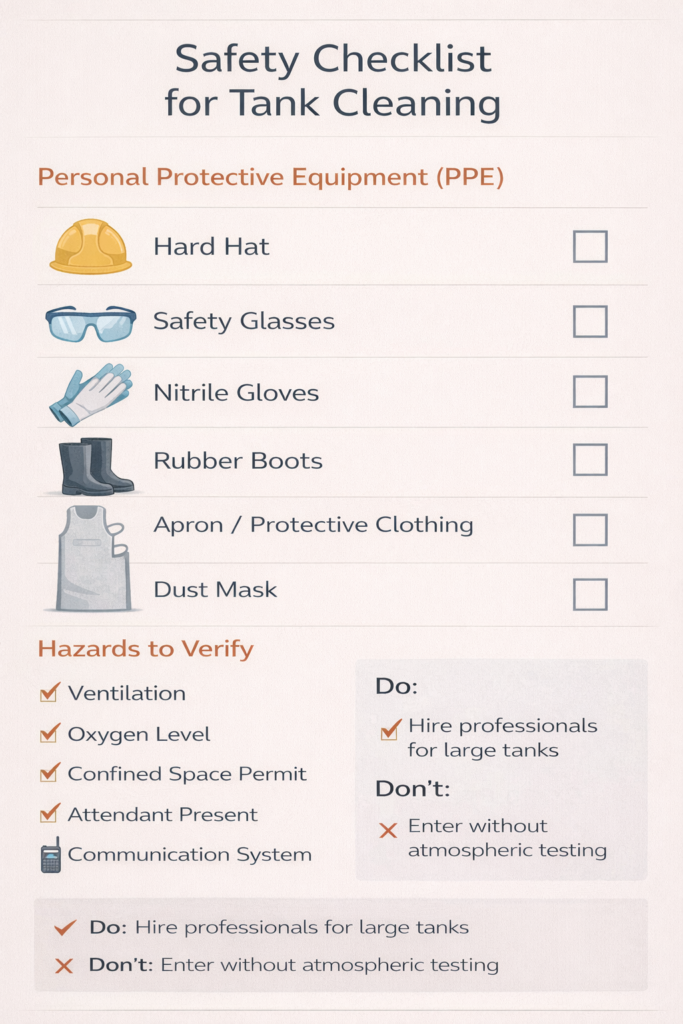
A formal confined-space entry permit system is required. This should include:
- Pre-entry atmospheric testing (oxygen, H2S, CO minimum)
- Forced ventilation or respiratory protection
- Trained standby attendant positioned outside the tank
- Communication system (radio, rope signals, or visual contact)
- Emergency rescue plan and equipment
- Entry permit signed by authorized supervisor
We recommend hiring licensed professional tank cleaning contractors for large installations or when internal entry is necessary. This mitigates liability and ensures regulatory compliance.
Step-by-Step GRP Tank Cleaning Procedure
Step 1: Plan & Isolate the Tank (30 minutes)
- Notify users of planned cleaning and water shutoff. Post notices at each tap/outlet.
- Close the inlet valve at the water supply connection to prevent refill during cleaning.
- Stop the pump (if one is installed) and isolate it with a lockout/tagout procedure. Ensure electrical disconnect is visible and locked.
- Turn off any connected equipment (filters, UV disinfection systems, pressure boosters).
- Verify no pressurized water remains by slowly opening a tap or drain valve.
- Document the action in your tank maintenance logbook (see template below).
Step 2: Safely Drain the Tank (60–120 minutes depending on size)
- Open the drain valve at the lowest point of the tank. Use a submersible pump if the tank lacks a drain or if gravity drainage is too slow.
- Protect surroundings: Direct drained water away from foundations, electrical equipment, and neighbors’ properties. Chlorinated/treated water should not discharge directly into septic systems or surface water bodies. Use a temporary collection basin or direct to municipal sewer if available.
- Monitor for hazards: If a foul smell emerges during drainage, ventilate the area and do not enter until air quality improves.
- Inspect inside the drained tank (from outside) using a flashlight. Note sediment depth, discoloration, or visible biofilm. This informs your cleaning intensity.
- Do not leave the tank open and unattended. Cover the opening with a board or barrier to prevent falls or accidental entry.
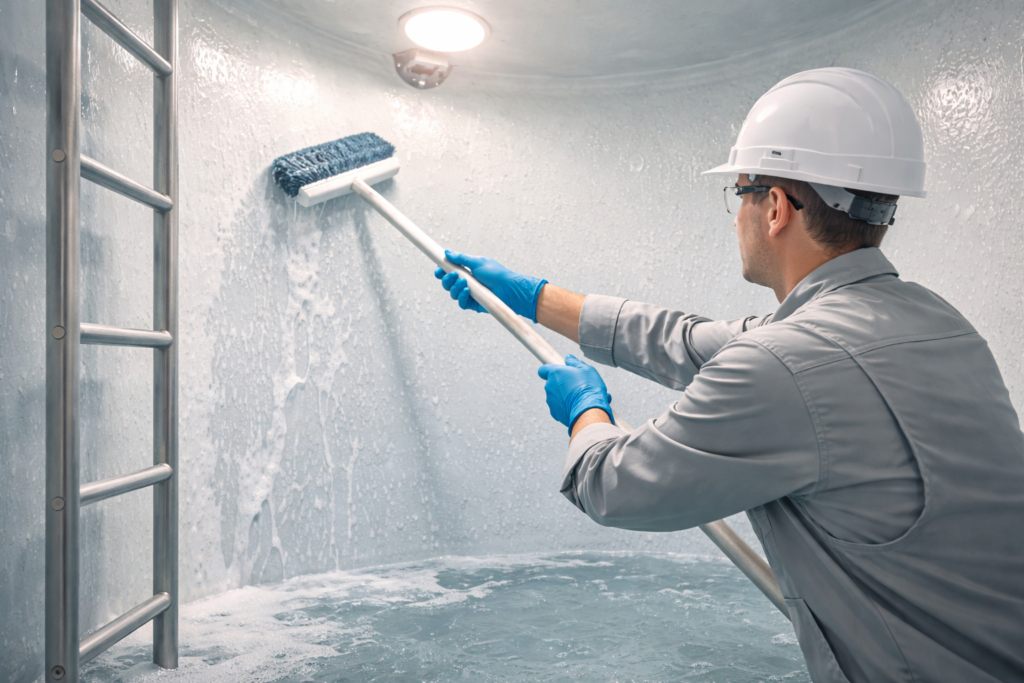
Step 3: Physical Cleaning—Remove Sediment and Biofilm (120–180 minutes)
For Small Tanks (≤5 m³) with External Access:
- Use a long-handled, soft-bristled brush (not wire or abrasive pads—these damage GRP gelcoat).
- Scrub internal surfaces methodically: bottom first (where sediment accumulates), then sides, corners, and ladder.
- Flush with clean water as you scrub to resuspend and remove loosened sediment.
- For stubborn biofilm or algae stains:
- Use a mild detergent solution (pH-neutral, non-phosphate; typical household dish soap works) or commercial aquarium/pool-safe cleaner
- Apply with soft cloth or brush; scrub gently
- Rinse thoroughly with clean water
- Do NOT use acetone, bleach, or harsh acids on fresh GRP surfaces (though nitric acid in a 10% solution with full PPE can remove rust stains if necessary).
- Drain sediment and cleaning water completely.
- Inspect for damage: Look for cracks, leaks, or deteriorated gelcoat that may require repair before refilling. Note any issues for further action.
For Large Tanks or Internal Entry:
Hire a licensed professional contractor with confined-space certification. They have:
- Proper atmospheric monitoring equipment
- Industrial cleaning equipment (pressure washers at safe PSI, foam disinfection systems)
- Trained personnel in rescue and emergency protocols
- Insurance and compliance documentation
Step 4: Inspect Key Components (30 minutes)
While the tank is drained, inspect and test:
- Manhole gasket and seal: Look for cracks, hardening, or separation. If gasket is deteriorated, replace before refilling.
- Vent screen: Clean or replace if clogged with dust or biofilm. Ensure the screen is intact to prevent insect/dust entry.
- Inlet and outlet fittings: Feel for corrosion (shouldn’t happen with GRP but pipes may corrode), sediment buildup, or leaks. Clean sediment with a cloth; do not scratch surfaces.
- Overflow pipe: Verify it drains freely; clean if needed.
- Drain valve: Open/close a few times to ensure smooth operation. Clean internally if debris is visible.
- Bolts and fasteners: Check torque on tank bolts (per manufacturer specs, typically 20–30 N·m); retighten if loose. Loose bolts can cause leaks.
- External condition: Inspect for UV fading (normal), visible cracks (require repair), dirt/dust accumulation (clean with hose), or nesting insects.
Step 5: Rinse Thoroughly (60 minutes)
- Close the drain valve after all sediment has emptied.
- Connect a clean hose to a water supply (municipal supply or stored clean water).
- Fill the tank to approximately 1/4 capacity and agitate (if pump is available, run briefly; if not, use a long stick to stir gently). This resuspends any residual sediment.
- Drain again completely and repeat 2–3 times until rinse water runs clear and no sediment or detergent foam is visible.
- Final rinse: Fill to full capacity, let settle for 30 minutes, then drain completely. This ensures all physical contaminants are gone before disinfection.
Step 6: Disinfection—Chlorination Procedure (24–30 hours total, 10 minutes active work)
Disinfection is essential to eliminate bacteria, viruses, and protozoa.
Materials Needed:
- Chlorine source: High-Test Hypochlorite (HTH) granules or powder (50–70% available chlorine), or sodium hypochlorite solution (liquid bleach, ~5% available chlorine). HTH is preferred for large tanks due to stability and shelf life.
- Clean bucket for dissolving chlorine
- Measuring cup or scale for precise dosing
- Stirring rod (plastic or wood, not metal)
- Chlorine test kit (DPD method or visual comparator strips; obtain from pharmacy or water quality supplier in KSA)
- PPE: Gloves (nitrile), eye protection, dust mask (if using powder), apron
- Safety: Keep chlorine in a cool, dry location away from acids. Do not mix with other chemicals.
Disinfection Dosage Calculation:
WHO and CDC guidance recommends achieving a free chlorine residual of 10 ppm (mg/L) when the tank is full of water after mixing.
Method for HTH (High-Test Hypochlorite):
If using HTH powder (assume 65% available chlorine):
Dosing formula: (Tank volume in liters) × 10 ppm ÷ 1000 ÷ 0.65 = grams of HTH
Example: For a 5,000-liter (5 m³) tank:
(5,000 × 10) ÷ 1,000 ÷ 0.65 = 77 grams of HTH
Method for Sodium Hypochlorite (Liquid Bleach ~5%):
Dosing formula: (Tank volume in liters) × 10 ppm ÷ 1000 ÷ 0.05 = mL of bleach
Example: For a 5,000-liter tank:
(5,000 × 10) ÷ 1,000 ÷ 0.05 = 10,000 mL = 10 liters of bleach
Step-by-Step Application:
- Prepare chlorine solution:
- Dissolve HTH powder in a clean bucket of water (not into the tank dry—this causes local overdose)
- Or use liquid bleach directly from the container
- Calculate exact amount using the formulas above; verify with product label
- Fill tank with water to full capacity (do this first, before adding chlorine).
- Pour the dissolved chlorine solution slowly into the tank, mixing as you pour. If possible, use the outlet/inlet circulation to mix; if not, stir with a long rod for 2–3 minutes.
- Close the tank (manhole cover, lid, or seal). Ventilation should be maintained if possible (leave vent screen open).
- Wait 24 hours. This contact time ensures effective disinfection of all surfaces and biofilm. If urgent use is required, double the chlorine dose and reduce contact time to 8 hours; verify this with the product label and local regulations.
- Measure chlorine residual after 24 hours using a test kit:
- Draw a sample in a clean container
- Use DPD test kit (5-drop method) or visual comparator strip
- Target residual: 0.5–2.0 mg/L (safe for continued use without additional flushing)
- If residual is >2 mg/L, proceed to flushing (Step 7)
- If residual is <0.2 mg/L, the tank was not adequately disinfected; repeat chlorination
Step 7: Final Flush & Verify Chlorine Residual (180–240 minutes)
- Empty the tank completely using the drain valve. Dispose of highly chlorinated water safely (do NOT discharge directly to septic systems; use municipal sewer if available, or allow to dechlorinate in a collection basin for 24 hours before disposal).
- Refill the tank with fresh water.
- Test the water immediately after refilling:
- Draw a sample in a clean, chlorine-free container
- Use a test kit to measure free chlorine residual
- Acceptable residual: 0.3–0.5 mg/L. This indicates disinfection effectiveness without excess chlorine.
- If chlorine odor is still present (>0.5 mg/L), continue flushing: empty again and refill, then re-test
- Repeat flushing until:
- Chlorine residual is <0.3 mg/L (no detectable smell in most cases), AND
- Water is clear and has no odor
- Do NOT use the water for consumption or cooking until chlorine residual is <0.3 mg/L and 24 hours have passed since final flushing. This “settle time” allows any residual chlorine to decay further and ensures water safety.
Step 8: Post-Clean Water Quality Checks (Baseline Documentation)
Before putting the tank back into full service, perform basic water quality checks:
- Appearance: Clear, no visible sediment, cloudiness, or discoloration
- Smell: No musty, sulfur, or chemical odor (slight chlorine is acceptable immediately post-disinfection)
- Taste: No off-flavors (optional, but informative for villa owners)
- If available: Test with a multimeter for pH (target 6.5–8.5), and basic turbidity observation (hold a glass up to light; should be crystal clear)
If the water fails these basic checks, contact a water quality lab in your area (e.g., labs in Riyadh, Jeddah, or Dammam offering municipal water testing) for microbiological analysis (bacterial count, coliforms).
Step 9: Restart System & Record (15 minutes)
- Open the inlet valve slowly to refill the tank. Monitor for leaks at all joints and fittings.
- Restart the pump (if installed). Listen for unusual sounds; verify pressure on gauges.
- Bleed air from pipes: Open the highest faucet for 30 seconds to expel trapped air.
- Notify users that water is available again. Post a “Tank Cleaned” notice with date and technician name.
- Document in your maintenance logbook (see template in next section):
- Date and time of cleaning
- Tank ID/location
- Chemicals used and amounts
- Initial and final chlorine residual (mg/L)
- Any issues found (leaks, cracks, corroded fittings)
- Corrective actions taken
- Technician name and signature
Maintenance That Prevents Frequent Cleaning (KSA-Focused Practices)
Proactive maintenance reduces the need for frequent deep cleaning and keeps your GRP tank hygienic longer:
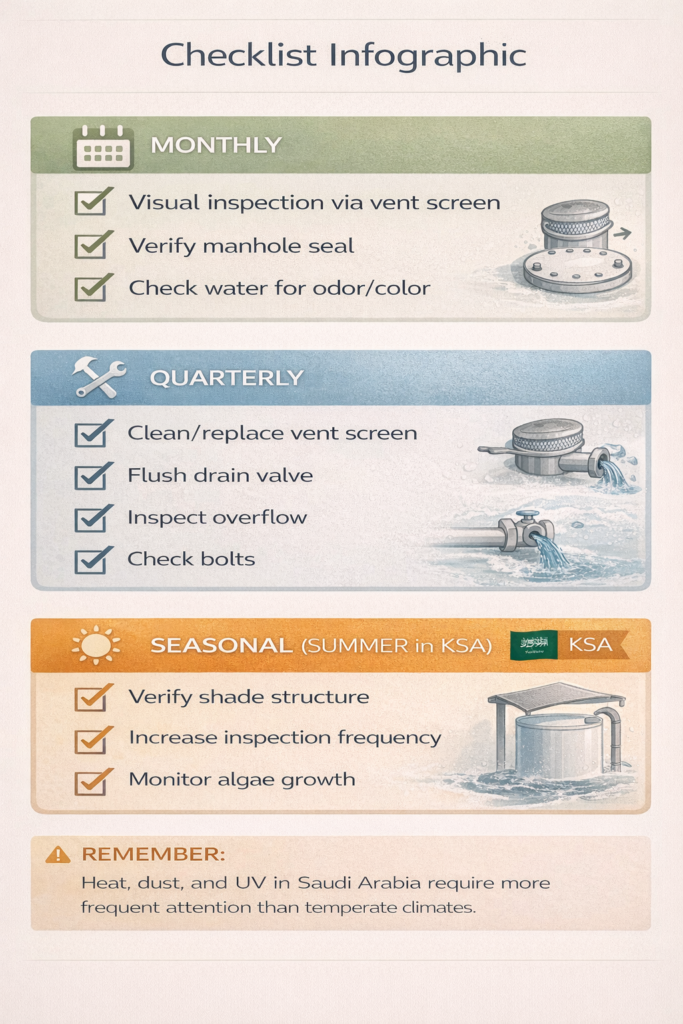
Monthly Checks (5 minutes)
- Visual inspection through vent screen: Look for dust accumulation, debris, or signs of pest entry
- Verify manhole seal: Ensure the cover is tight; check for loose bolts
- Smell/look at water: Any unusual odor or discoloration warrants attention
- Pump operation: If installed, ensure it starts/stops normally; listen for unusual noises
Quarterly Maintenance (30 minutes)
- Clean or replace vent screen if dust-clogged. A clogged vent slows water flow and reduces air circulation, encouraging stagnation.
- Flush the drain valve 2–3 times by opening it for 10 seconds each. This dislodges accumulated sediment in the drain line.
- Inspect overflow pipe for debris or blockage; clear if necessary.
- Clean external surfaces with a hose to remove dust and salt spray (especially important in coastal areas).
- Check bolts and fasteners for looseness; retighten per manufacturer specs.
Seasonal Practices (Summer = High Risk in KSA)
- Install or verify shade structures over rooftop tanks. Sunlight accelerates algae growth; even partial shade reduces internal temperature by 5–10°C.
- Verify that vent screens are insect-proof before the peak dust season (April–June in many parts of KSA).
- Increase inspection frequency to monthly or weekly if the tank shows signs of algae (green tint, biofilm).
- Ensure pump ventilation is not restricted; heat from summer operation can degrade seals prematurely.
Best Practices to Minimize Biofilm & Contamination
| Practice | Benefit | KSA Priority |
|---|---|---|
| Keep manhole sealed when not in use | Prevents dust, insects, debris ingress | High – desert dust in KSA is pervasive |
| Maintain a residual chlorine level of 0.3–0.5 mg/L if system allows (secondary disinfection in distribution lines) | Continuous microbial suppression; reduces biofilm growth | Medium – recommended for large systems; residential villas typically skip this |
| Avoid stagnation: use the tank regularly | Stagnant water promotes anaerobic bacteria; flow keeps surfaces cleaner | High – villa occupancy varies; encourage regular use |
| Install overflow pipe screen or valve | Prevents insects, algae-forming light exposure | High |
| Position tank away from direct sunlight or provide shade | Reduces temperature, algae growth, and UV stress on GRP | High – Saudi summer heat is extreme |
| Inspect incoming water source for sediment | Reduces sediment load in tank | Medium – depends on municipal supply quality |
| Maintain tight isolation between tank and distribution system during cleaning | Prevents accidental contamination or backflow | High – standard practice, critical for safety |
Common Mistakes to Avoid
- Over-scrubbing or using abrasive tools: Wire brushes, steel wool, or high-pressure power washers above 100 PSI will damage the gelcoat and create micro-scratches where bacteria harbor. Always use soft-bristled brushes and low-pressure washing only. Test on a small hidden area first.
- Using harsh chemicals or bleach directly on GRP surfaces: Strong acids, chlorinated solvents, or undiluted bleach can degrade the resin. Disinfect by filling the tank with diluted chlorine water (not by scrubbing with bleach). For stains, use mild detergents or diluted solutions (10% nitric acid in water with full PPE, for rust only).
- Not rinsing thoroughly after cleaning: Detergent residues can promote bacterial growth or alter water taste. Rinse at least 3–4 times with clean water until no foam or odor remains.
- Ignoring vent screen maintenance: A clogged vent prevents air exchange and can create vacuum pressure or stagnation. This accelerates biofilm growth and can damage the tank. Replace or clean quarterly.
- Not keeping maintenance records: Without documentation, you cannot track trends (increasing sediment?), verify compliance, or respond to water quality complaints. Maintain a simple logbook (template provided below).
- Refilling too quickly after disinfection: Allowing only 2–3 hours before use after chlorination leaves excessive chlorine residual (>2 mg/L), which creates unpleasant taste/odor and increases disinfection byproducts. Wait 24–48 hours and verify residual is <0.5 mg/L.
- Skipping the chlorine residual test: Assuming disinfection worked without testing is risky. A test kit is inexpensive (SR 50–150 from pharmacies/labs in KSA) and essential for liability and safety documentation.
- Assuming internal entry is safe without permits or monitoring: Confined-space entry without proper atmospheric testing, ventilation, and rescue standby can be fatal. Always hire professionals for large tanks or internal work.
- Not addressing visible leaks or cracks: Small leaks in bolted panels become major failures within weeks due to pressure and thermal cycling. Fix immediately—bolts may be loose, or gaskets may have failed.
- Failing to isolate the pump before entry or work: Accidental pump startup while someone is inside or working on pipes can cause serious injury. Always use lockout/tagout and verify isolation before entering a confined space.
FAQs
Q1: How often should I clean my GRP water tank in Saudi Arabia?
A: The National Water Company (NWC) and WHO recommend cleaning at least every 6 months for potable water tanks. However, in Saudi Arabia’s hot, dusty climate (especially on rooftops), quarterly cleaning (every 3 months) is often more practical, particularly if the tank shows signs of sediment, odor, or biofilm. For industrial or high-use facilities, monthly inspections with cleaning every 2–3 months is standard.
Q2: Is bleach safe to use inside a GRP water tank?
A: Yes, diluted sodium hypochlorite (household bleach, ~5% available chlorine) is safe for disinfecting GRP tanks if used at the correct dose (targeting 10 ppm residual chlorine, then flushed to <0.3 mg/L). However, never scrub GRP surfaces with undiluted bleach or bleach-soaked cloths—this can degrade the resin. Always calculate the correct dose per tank volume, mix thoroughly, wait 24 hours, measure residual with a test kit, and flush completely before use. HTH (High-Test Hypochlorite) powder is preferred for large tanks due to stability and accurate dosing.
Q3: How long must I wait after disinfection before using the water?
A: After chlorination, wait at least 24–48 hours, then measure the free chlorine residual using a test kit. The water is safe to use when residual is <0.3 mg/L (no detectable chlorine smell in most cases). If you must use the water urgently, use a higher chlorine dose (200 ppm) and reduce contact time to 3 hours, but this should be exceptional; the standard is 24 hours at 10 ppm.
Q4: Can I clean my tank without entering it?
A: Yes, for small tanks (≤5 m³) and external-only contamination, cleaning is possible without entering. Use the drain valve to empty the tank, rinse with clean water via inlet/outlet fittings, and disinfect by filling with chlorine solution without entry. However, if you observe severe sediment, biofilm, or internal rust (on old steel components inside a GRP tank), internal inspection and scrubbing may be necessary—this requires confined-space entry protocols or professional contractor involvement.
Q5: What should I do if I see algae or biofilm inside the tank?
A: 1) Drain the tank. 2) Brush affected surfaces gently with a soft-bristled brush and mild detergent solution. 3) Rinse thoroughly. 4) Disinfect with chlorine at 10 ppm, 24-hour contact time. 5) Flush until residual is <0.3 mg/L. 6) Increase maintenance frequency to monthly inspections and quarterly cleaning if algae recurs. Algae growth indicates either sunlight exposure (install shade) or stagnation (use the tank regularly). If biofilm is persistent, consider adding a secondary disinfection system (in-line chlorinator or UV) to maintain 0.3–0.5 mg/L residual in the distribution system.
Q6: How can I prevent dust and insects from getting inside my tank?
A: 1) Keep the manhole cover sealed tightly when not in use. 2) Install and maintain a fine-mesh vent screen on the overflow and air vent. 3) Clean vent screens monthly (they clog easily with dust in the KSA). 4) Position the tank in a shaded area or provide a cover/structure to minimize direct sunlight exposure. 5) Elevate the tank slightly above ground and ensure surrounding area is sloped away to prevent water pooling. 6) Inspect quarterly for ant nests, wasp nests, or spider webs near the manhole or vent.
Q7: Should I test the water after cleaning and how?
A: Yes, absolutely. After disinfection and flushing, test the water for:
- Free chlorine residual: Use a DPD test kit (5-drop method) or visual comparator strips (obtain from pharmacies or water quality labs in Saudi Arabia). Target: <0.3 mg/L before use.
- Appearance: Clear, no sediment, no cloudiness
- Odor/taste: No off-smells or flavors (slight chlorine odor immediately post-disinfection is normal)
- If available (optional): pH (target 6.5–8.5) and basic turbidity (hold a glass to light; should be crystal clear)
If the tank is part of a municipal or commercial system serving many people, consider sending a sample to a certified water quality lab in your area (available in Riyadh, Jeddah, Dammam) for microbiological testing (coliforms, E. coli, heterotrophic bacteria count) every 12 months.
Q8: When should I replace gaskets or vent screens?
A: 1) Gaskets: Inspect every 6–12 months. Replace if you observe hardening, cracking, visible deterioration, or signs of leaking from bolted seams. GRP tank gaskets typically last 5–10 years depending on UV exposure and water temperature; in KSA’s heat, 5–7 years is typical. 2) Vent screens: Replace if mesh is torn, clogged and cannot be cleaned, or if debris accumulates despite regular cleaning. Typical replacement: annually or as needed (SR 100–500 per screen from suppliers in Riyadh/Jeddah).
Conclusion
Maintaining a clean, disinfected GRP water tank is essential for health, safety, and regulatory compliance in Saudi Arabia. By following this step-by-step guide—cleaning every 6 months (or more frequently in hot/dusty locations), disinfecting with verified chlorine residual targets, and performing monthly/quarterly preventive maintenance—you ensure a reliable, hygienic water supply for your villa, facility, or organization.
Key Takeaways:
✓ Frequency matters: 6-month minimum; quarterly preferred in KSA’s climate
✓ Safety first: Use non-abrasive methods on GRP; hire professionals for large tanks
✓ Chlorine works: 10 ppm for 24 hours achieves effective disinfection; verify residual <0.5 mg/L post-flush
✓ Records count: Document every cleaning, chemical used, and any issues found
✓ Prevention pays: Monthly inspections and quarterly maintenance reduce contamination risk
✓ Standards apply: SASO-GSO-1831, WHO, and local authority guidelines are non-negotiable for potable water
GRP tanks offer superior durability and hygiene compared to steel or concrete. Treat them with care—use soft brushes, avoid harsh chemicals, keep them covered and shaded, and maintain a consistent cleaning schedule. Your family, tenants, or workforce will benefit from safe, clean water throughout the year.
Call to Action
Clean water starts with clean tanks. If you operate a GRP water tank facility in Saudi Arabia and need professional cleaning, maintenance, or replacement tank components (manhole covers, vent screens, gaskets, fittings), Pioneers Fiberglass Co. Ltd. is here to support you.
Request a Quote for your site assessment or tank maintenance plan.
Talk to Our Engineers about compliance, water quality concerns, or best practices specific to your location and usage.
SOURCES LIST
National Water Company (NWC) Saudi Arabia – Guidelines for Waterproofing of Underground Water Tanks[mdpi]
URL: https://www.nwc.com.sa/EN/HousingSector/Pages/Guidelines%20for%20Waterproofing%20of%20Underground%20Water%20Tanks.pdf
Summary: Official Saudi guideline recommending tank cleaning at least every 6 months; specifies SASO-GSO-1831 compliance and maintenance protocols for potable water systems.
WHO Technical Note 03 – Cleaning and Disinfecting Water Storage Tanks and Tankers[mdpi]
URL: https://cdn.who.int/media/docs/default-source/wash-documents/who-tn-03-cleaning-and-disinfecting-water-storage-tanks-and-tankers.pdf
Summary: WHO’s authoritative guidance on tank disinfection; includes 24-hour chlorination protocol, residual testing, and emergency disinfection procedures.
SASO-GSO-1831:2021 – Specification for Potable Water Storage Tanks (GRP/FRP)[mdpi]
URL: https://www.gso.org.sa/store/standards/GSO:790667/GSO%201831:2021?lang=en
Summary: Gulf Standardization Organization standard for GRP potable water tank design, materials, testing, and certification requirements in Saudi Arabia and GCC.
WHO Guidelines for Drinking Water Quality (2022)[mdpi]
URL: https://www.who.int/publications/i/item/9789240045544
Summary: International standards for potable water safety; chlorine residual targets, microbiological quality, and tank hygiene protocols.
CDC / Maine Department of Health & Human Services – Cleaning, Disinfecting, and Flushing Drinking Water Storage Tanks[pmc.ncbi.nlm.nih]
URL: https://www.maine.gov/dhhs/mecdc/environmental-health/dwp/fit/documents/CleaningStorageTanks.pdf
Summary: US CDC-aligned guidance; cleaning frequency (every 5 years), disinfection procedures (10 ppm, 24-hour contact), and flushing protocols.
Minnesota Department of Health – Cleaning and Disinfecting Non-Pressurized Water Storage Tanks[pmc.ncbi.nlm.nih]
URL: https://www.health.state.mn.us/communities/environment/water/docs/ncom/stortankdisinfect.pdf
Summary: Detailed procedures for tank disinfection, residual testing, and emergency protocols; references OSHA confined-space entry requirements.
Tank Liners Australia – Water Storage Tank Cleaning Schedule Guide[mdpi]
URL: https://tankliners.com.au/water-storage-tank-cleaning-schedule/
Summary: Practical guidance on cleaning frequency (2–5 years typical), water quality factors, and signs indicating immediate cleaning need.
OSHA Regulation 29 CFR 1910.146 – Permit-Required Confined Spaces[frontiersin]
URL: https://www.osha.gov/confined-spaces
Summary: US occupational safety standard; defines confined spaces (including tanks), hazards (oxygen deficiency, toxic gases), and entry permit requirements. Internationally recognized benchmark.
Ontario Ministry of the Environment – Procedure for Disinfection of Drinking Water in Ontario[grpcompanydubai]
URL: https://www.ontario.ca/page/procedure-disinfection-drinking-water-ontario
Summary: Free chlorine residual targets (0.2–5.0 mg/L range), disinfection methods, and contact time protocols aligned with WHO guidelines.
Enviro FWA – Guide to Cold Water Tank Cleaning and Maintenance[alshamsigroupllc]
URL: https://envirofwa.com/2024/03/26/crystal-clear-essential-guide-cold-water-tank-cleaning-maintenance/
Summary: Comprehensive practical guide covering cleaning frequency, disinfection procedures, residual chlorine targets, and flushing protocols.
Tank Liners Australia – Tank Corrosion Protection: Material and Maintenance[watertankfrp]
URL: https://tankliners.com.au/protecting-tanks-corrosion-maintenance/
Summary: Disinfection procedures for potable tanks, chlorine contact times, and safe residual ranges verified against WHO standards.
Poly Processing Company – NSF/ANSI 61 Certification Decoded[dnv]
URL: https://tanks.polyprocessing.com/hubfs/NSF_Poly_eBook_Final.pdf
Summary: NSF certification standards for potable water tank materials; chlorine compatibility and safe residual limits for drinking water.
The Healthy Home (Saudi Arabia) – 5 Tips to Maintain Clean Water Tank in Riyadh During Summers[alnajoffiberglass]
URL: https://thehealthyhome.me/en/sa/facts-stats/5-tips-to-maintain-a-clean-water-tank-in-riyadh-during-summers
Summary: KSA-specific maintenance practices; shade protection, seasonal precautions, and professional cleaning guidance for Riyadh climate.
Saudi Food & Drug Authority (SFDA) – Technical Requirements for Food and Water Manufacture[afcosteel.com]
URL: https://sfda.gov.sa/sites/default/files/2024-07/TechnicalRequirementsFoodWaterManufacture.pdf
Summary: Saudi regulations for water storage facilities; tank material requirements, closure/sealing, and contamination prevention measures.
TFM (Professional Tank Cleaning – KSA) – Water Tank Cleaning Services in Saudi Arabia[aesarabia]
URL: https://tfm.sa.com/water-tank-cleaning/
Summary: Professional cleaning company operating in Riyadh, Jeddah, and KSA; documents typical cleaning procedures, frequency recommendations, and issues addressed.
Aquosys – GRP Tank Maintenance Checklist: A Simple Guide to a 30-Year Lifespan[linkedin]
URL: https://aquosys.co.ke/grp-tank-maintenance-checklist-a-simple-guide/
Summary: GRP-specific maintenance protocols; monthly, quarterly, and seasonal task checklists; gasket/screen replacement timelines.
Yongchang FRP – Steps Involved in FRP Storage Tank Cleaning[afcosteel.com]
URL: https://www.yongchangfrp.com/resources/steps-involved-in-frp-storage-tank-cleaning.html
Summary: FRP tank cleaning procedures without internal entry; drainage, external cleaning, and disinfection methods.
MDPI – Multi-Species Biofilms in Drinking Water Provide Increased Protection Against Chlorine Disinfection[saudipolycon]
URL: https://figshare.com/articles/journal_contribution/Multi_species_biofilms_defined_from_drinking_water_microorganisms_provide_increased_protection_against_chlorine_disinfection/13303206
Summary: Biofilm research; chlorine efficacy in water systems; explains why higher residual or longer contact times may be needed if biofilm is severe.
OSHA Confined Space Guide for General Industry[alragheedhtanks]
URL: https://www.dir.ca.gov/dosh/dosh_publications/confspa.pdf
Summary: Comprehensive confined-space safety; entry permits, atmospheric testing, PPE, and rescue procedures—applicable standard for tank entry internationally.
World Health Organization (WHO) – Drinking Water Quality Assessment[informedinfrastructure]
URL: https://www.who.int/publications/i/item/9789240045544
Summary: WHO standard for microbiological testing; coliforms, E. coli, heterotrophic bacteria counts; laboratory testing protocols for potable water.
SASO (Saudi Standards, Metrology and Quality Organization) – Standards Store[sherbiny]
URL: https://www.gso.org.sa/en/
Summary: Primary GCC standards body; access to SASO-GSO-1831 (tanks), GSO 149/2014 (water quality), and related regulations.
Saudi Water Authority (SWA) – Regulations, Rules and Decisions[jstage.jst.go]
URL: https://www.swa.gov.sa/en/regulations-rules
Summary: Official SWA regulatory framework for water sector; contact point for local compliance and authority-specific tank maintenance requirements.